Registering an Agent — Step-by-Step Guide
TraptureIQ lets you bring an existing Google ADK agent under your Google ADK Agent Control Plane in under five minutes. No SDK installs, no code changes, no extra middleware — point TraptureIQ at your agent's HTTPS endpoint, choose the deployment type (Agent Engine, Cloud Run, or Custom), and you're done.
Important: Only Tenant Admins can register and configure agents.
Before You Start
Make sure you have:
- Your agent's HTTPS endpoint URL (the URL where your agent's API is listening)
- An agent built with Google ADK (the only supported framework today)
- Knowledge of your agent's deployment type (Agent Engine, Cloud Run, or Custom)
- If using Agent Engine: access to your GCP project to set up authentication
Registration Workflow
Step 1: Basic Information
Navigate to Admin (or Agent Management) in the sidebar and click + Register Agent.
Fill in:
| Field | What to Enter | Example |
|---|---|---|
| Name | A display name for your agent — this is what your team will see | "SRE Bot", "Customer Support Agent" |
| Description | A brief explanation of what the agent does — shown on the agent card | "Helps troubleshoot production incidents" |
| Tags | Categories for organizing agents (optional) | production, support, internal, beta |
Step 2: Framework & Deployment
Point TraptureIQ to your agent's live endpoint.
Framework — TraptureIQ is purpose-built for Google ADK:
| Framework | Choose This If... |
|---|---|
| Google ADK | Your agent was built using the Google Agent Development Kit |
Deployment Type — Select where your agent is running:
| Type | Choose This If... | Auth Required? |
|---|---|---|
| Agent Engine | Your agent is hosted on Vertex AI Agent Engine (Google-managed) | Yes |
| Cloud Run | Your agent is deployed as a Cloud Run service | No |
| Custom | Your agent is hosted anywhere else (on-premises, AWS, local, etc.) | No |
Endpoint URL — Enter the full HTTPS URL where your agent's API is listening (e.g., https://my-agent-abc123.run.app).
Step 3: Authentication
If your agent's deployment type is Agent Engine, you need to set up authentication. Choose one of three methods:
| Method | What You Need to Do | When to Choose |
|---|---|---|
| Authorize with Impersonation | Create a service account in your GCP project and grant TraptureIQ permission to impersonate it | Recommended for most organizations — most secure, no credentials exchanged |
| Authorize TraptureIQ Principal | Grant TraptureIQ's service account direct permissions on your project | Fastest setup — one permissions grant and you're done |
| Upload SA Key | Download a service account key JSON and upload it | When cross-domain permission restrictions prevent the other methods |
For detailed step-by-step instructions for each method, see the Authentication Setup guide.
If your deployment type is Cloud Run or Custom: No authentication setup is needed — TraptureIQ connects directly over HTTPS.
Step 4: Verification (Test Connection)
Before saving, click the Test Connection button. This runs three checks:
| Check | What It Verifies | What Happens If It Fails |
|---|---|---|
| Heartbeat | The URL is reachable and responding | Check that the endpoint is deployed and accessible over the internet |
| Auth Verification | TraptureIQ can authenticate to your project (Agent Engine only) | Review your authentication setup — permissions may be missing |
| Framework Handshake | The endpoint's response format matches the selected framework | You may have selected the wrong framework — try a different one |
Expected result for success: All three checks show green checkmarks. You're ready to save.
Expected result for failure: The failing check will show a red indicator with an error message explaining what went wrong.
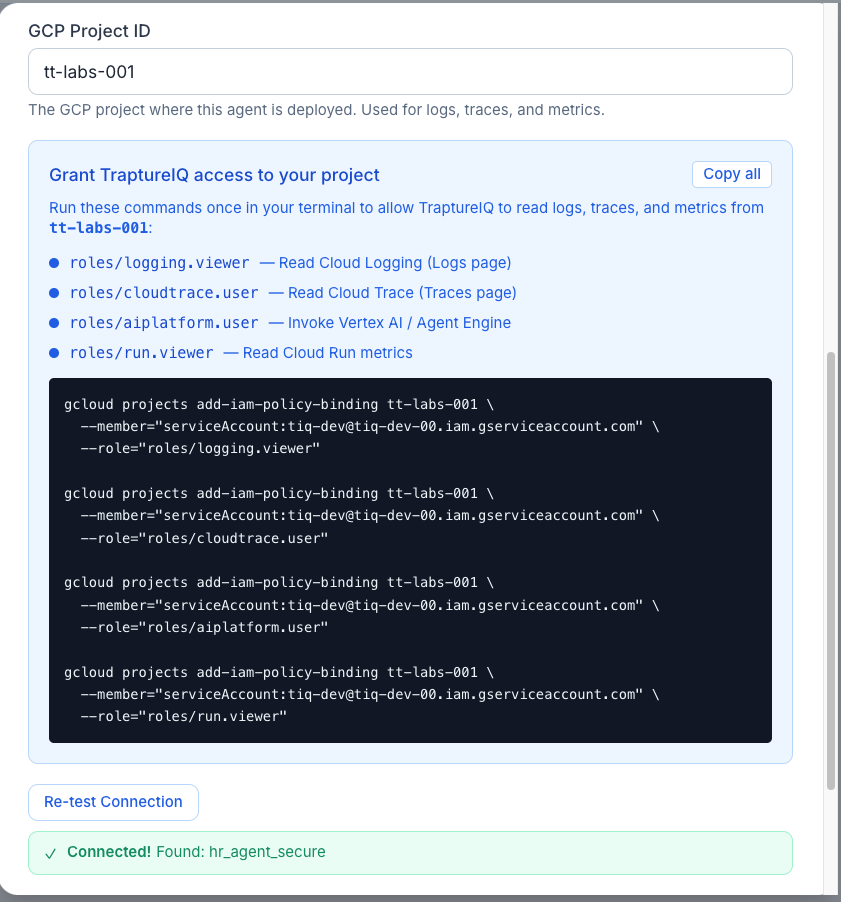
Step 5: Agent Configuration
| Field | What It Does |
|---|---|
| GCP Project ID | The Google Cloud project where the agent is deployed. Required for logs and traces. |
| ADK App Name | For ADK agents — auto-detected during the test connection. Select from the list if prompted. |
| Config JSON | Optional advanced configuration. Leave empty unless instructed by your agent's setup guide. |
Click Save to complete the registration.
What Happens After Registration
Once you save, the following happens automatically:
| What | What It Means |
|---|---|
| Chat Available | The agent appears in the Agents page for all permitted users. Anyone with access can start chatting immediately. |
| Security Active | If AgentGuard is enabled, all prompts and responses for this agent are now monitored in real-time. |
| Observability Active | Every message sent to the agent begins appearing in Traces and Logs. |
| Analytics Active | Token usage, costs, and performance metrics are tracked in Analytics and Cost Control. |
Supported Framework
TraptureIQ is purpose-built for Google ADK agents. The framework field is preset to ADK when registering a new agent.
For details on deployment types and authentication options, see the Supported Framework guide.
Tips for Beginners
- Start with one agent — Register your simplest agent first to learn the workflow, then add more.
- Always test the connection — Don't skip the Test Connection step. It catches most configuration issues immediately.
- Verify your agent is built on ADK — If the connection handshake fails, confirm your agent uses Google's Agent Development Kit.
- Cloud Run is the easiest — If your agent is on Cloud Run, no authentication setup is needed. It's the fastest way to get started.
- Name descriptively — Give your agents clear, descriptive names so your team can easily find and identify them.